Monday, March 28, 2011

Lights, Camera, Action!...??

I have been a little MIA from blogging recently. Mainly because I have been busy trying to complete my photography assignments, but also because I have been trying to prepare for my upcoming new job. Yes, my very first job in food photography and I am nervous!


I got a call today confirming that the photo shoot will be taking place in a couple of days time. After having gone through the Client's competitors' websites, Ive noted that they all display clean, simple, commercial food photos. White on white pretty much (white dishes on white backgrounds). 


Here are my quick attempts in the last half hour to practise my shots and to ensure I familiarize myself enough with my lighting techniques. This will be a leap of faith for sure!


To practise my shots, I used some left over dinner from last night - home made polenta fries, and 'dressed' them up a bit. The first shot was taken purely with natural light from behind. I used a reflector at the front to fill the area in front of the bowl with light, and to reduce the strength of the shadows. Not too bad.


Ok, now second shot was taken with the only proper lighting equipment I have available - our Canon 430EX Speedlight. Positioned from directly above, but at a 45 degree angle. Again I used a reflector to cast some light onto the area in front of the bowl. 


Personally, I prefer the first shot. I think the texture in the food is more visible and the overall image has greater dimension to it, despite the weaker shadow. The second image looks somewhat flat in detail. 

I need to figure out what type of lighting equipment Im going to need for the photo shoot on Wednesday. I think Soft Boxes are the way to go. At least ill be able to have more control over the direction of the light, unlike if I were to use an 'umbrella'. 

The smaller the light source, the harsher the light. I found this to be very true. 

If you have any feedback, please do swing them my way. I still have some learning to do in regards to mastering lighting in food photography. Wish me luck for Wednesday! You'll hear from me again next week (ill include a recipe for Polenta Fries then, perhaps).

Thursday, March 17, 2011

Ratatouille!

No not the movie :)


My sister gifted me the Cook's Bible by Lorraine Turner a few years ago and I have been following recipes from it since.  I had never, until a few nights ago however made Ratatouille before. Its so far one of my favourite vegetarian recipes.


The bowl in this pic was a birthday gift from my lovely friend Kirsten. It came with a matching platter and any kitchen ware gifts are always welcome! 

Ratatouille
(serves 4)

  • 1 Aubergine, about 250g/9oz
  • 4 Tbsp olive oil
  • 2 garlic cloves, chopped
  • 1 large onion, chopped
  • 2 red peppers (capsicums), deseeded and cut into bite-sized chunks
  • 800g/1 lb 12 oz canned chopped tomatoes
  • 2 courgettes, sliced
  • 1 celery stick, sliced
  • 1 tsp sugar
  • 2 Tbsp fresh thyme, chopped
  • salt and pepper
  • fresh thyme sprigs, to garnish
DIRECTIONS
  1. Trim the aubergine and cut it into bite-sized chunks, then place it in a colander. Sprinkle with salt and leave to stand for 30mins.
  2. Heat the oil in a large saucepan over medium heat. Add the garlic and onion and cook, stirring for 3mins until softened slightly. Rinse the aubergine and drain well, then add it to the saucepan with the red peppers. Reduce the heat and cook gently, stirring frequently for a further 10mins.
  3. Stir in the tomatoes, courgettes, celery, sugar and thyme, and season to taste with salt and pepper. Bring to the boil, then reduce the heat, cover the saucepan and leave to simmer gently for 30mins.
  4. Remove the saucepan from the heat, transfer to serving plates and garnish with fresh thyme sprigs.
The only type of aubergines my local grocery store stocked at the time was Chinese Aubergines, so I had no choice but to use this instead. They do not taste that differently from the usual aubergine ('American' or 'Globe' eggplant). If you use Chinese aubergines, you can eliminate Step 1 in the recipe as they have thinner skins and are more delicate in flavour, they also do not tend to have many of the seeds that make American/Globe eggplants bitter.

Ratatouille is such a versatile dish and really useful when catering for vegetarians. We had it for dinner as a side to compliment a Roasted Garlic chicken. It also goes well with jacket potatoes, rice or couscous. I like to sprinkle mine with a little parmesan cheese :)


Because of this cookbook, I came across another fantastic food photographer, Clive Bozzard-Hill. His style is pretty commercial, and I think i just might pick up ideas from his work as well from now on :)

Pumpkin spice and all things nice

I spent an entire day baking yesterday, primarily to finish off my leftover pumpkin pie puree from when I baked my Pumpkin Bread a few weeks ago..


I baked Pumpkin Pie Biscotti and Pumpkin Molasses Cookies and they were a hit with the hubby. 


Both recipes were taken from Jamie over at My Baking Addiction. She used pecans in her recipe however, but I thought almonds would compliment the biscotti a little better. All depends on your personal taste I suppose.


I wanted to fill the frame of this shot with a teacup and saucer, but currently do not own any so substituted for the coffee mug. I realize part of the biscotti piece has been cropped out - that was intentional as I did not want to make it appeared too centred. 


Here is the recipe from Jamie. I have adapted it slightly. She mentions that the brown sugar may have caused her biscotti to become too moist, so I substituted some of it for white sugar.

Pumpkin Pie Biscotti
  • 3 ½ cups all-purpose flour
  • 1 cup firmly packed brown sugar
  • ½ cup white granulated sugar
  • 2 tsp baking powder
  • ½ tsp salt
  • 2 tsp pumpkin pie spice (or combine 1 tsp cinnamon, ½ tsp nutmeg, ¼ tsp ground ginger, ¼ ground cloves)
  • ½ cup pumpkin puree
  • 2 large eggs, lightly beaten
  • 1 Tbsp vanilla extract
  • 2 Tbsp butter
  • 1 ¼ cups almonds, coarsely chopped
DIRECTIONS
  1. Preheat oven to 350 F (180 C)
  2. Combine flour, brown sugar, white sugar, baking powder, salt and pumpkin pie spice in a large bowl, stir well. In another bowl, combine pumpkin puree, eggs and vanilla, stirring well with a wire whisk. Slowly add pumpkin mixture to flour mixture, stirring until dry ingredients are moistened (Mixture will be very crumbly; it will gradually become moist after stirring. I found using my hands to knead it all together easier).
  3. Melt butter in a large skillet over med-high heat. Add nuts. Cook, stirring constantly, until nuts are browned. Remove from heat and cool completely.
  4. Knead or gently fold cooled nuts into dough. Place dough on a lightly floured surface and divide into 2 portions. Lightly flour hands and shape each portion into a 2x 10” long log. Place logs 3” apart on parchment paper. Bake for 24mins. Cool logs for 15mins. Reduce oven temperature to 300 F (140 C).
  5. After some cooling, move a loaf to a cutting board and cut into ½ inch thick pieces. Repeat with other loaf. The interior of each biscotto should still be just a little moist (while the exterior is nice and hard). Avoid using a serrated knife and try cutting straight down rather than ‘sawing’ to avoid crumbling.
  6. Place the biscotti with a cut side facing up on a half sheet pan and bake for 8mins. Remove the pan and flip all the biscotti over so the other cut side is now facing up. Bake for another 7mins. Set all pieces on a wire rack to cool making sure that none of the biscotti are touching each other. If they are placed too close together, they could get a little soft or soggy as they cool.
You can dip the biscotti in melted chocolate or drizzle some chocolate on top. I chose not to. Maybe next time


I am starting to get a little tired of my backdrops. I have been searching online for places where I can obtain scrap wood boards, which I can also paint different colours in order to create an illusion of different tables and surfaces. I suppose I should head over to a hardware or home improvement store. The Food Blog Forum has some good tips on this. The only issue for me is I do not have a car here in Toronto, so transporting huge wood boards on public transport can be an issue. Ill have to figure something out.


These Pumpkin Molasses Cookies are deliciously moist. Try out the recipe.

Thursday, March 10, 2011

Oreos, big and small

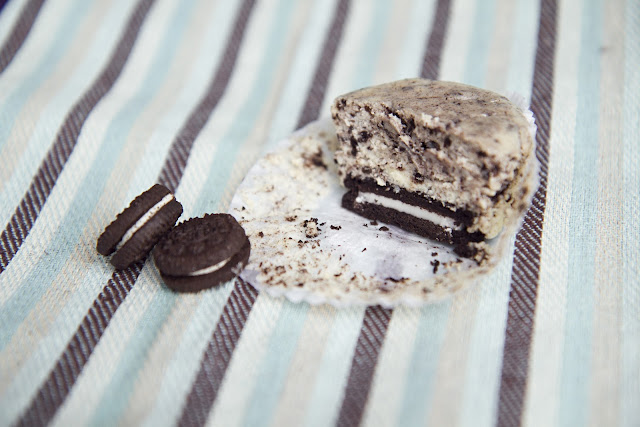
Who doesnt love Oreos? Oreos, big or small, double cream or original, they are all sinfully addictive. I came across a very cute recipe last week - Mini Oreo Cheesecake. So simple with few ingredients.

Mini Oreo Cheesecakes
(makes approx 12 mini cheesecakes)
  • 1 pkg. Oreo cookies
  • 2 (8 oz or 250g) packages of cream cheese, softened
  • ½ cup granulate sugar
  • 1 tsp vanilla extract
  • 2 large eggs
  • cupcake liners
DIRECTIONS
  1. Preheat oven to 325 F (160 C). Line cupcake tray with cupcake liners. Place one Oreo cookie in each cupcake liner
  2. Crush up remaining cookies finely and set aside
  3. Beat the cream cheese until smooth. Add the sugar, eggs and vanilla extract, and beat until fully incorporated and smooth
  4. Fold in crushed Oreo cookies
  5. Spoon mixture into the cupcake cups about ¾ of the way up
  6. Bake for 20-25mins. Keep a close eye on it as you do not want the cheesecakes to brown
  7. Let cool and refrigerate for up to 3 hours before serving


I love how the Oreo cookie acts as the crust of the cheesecake...


And now following in Aran Goyoaga's and Beatrice Peltre's footsteps...


If you follow my blog, you'll remember how I mentioned that im trying to also shoot with a more commercial style. Here are my 'more commercial' shots....

Tuesday, March 8, 2011

Clean Crisp Capsicums

For this month's 'Foodography Challenge'.... capsicums. Or known simply as 'peppers' here in North America. 

I thought this would be a good opportunity for me to play around with water splash photography. An exercise which proved to be a lot more difficult than I expected. 

From observing the experts, they use 2-3 speed lights or strobe lights for this in order to freeze the subject's motion as much as possible. I only have access to one speed light so placed it behind the subject, and placed household lamps in front for as much light as possible. 

Next item required = a fairly large glass tank. This glass bowl was the largest thing I had available which made it difficult for me to capture shots at the subject's level. Therefore, I decided to shoot from above, hoping to capture nice splashes around the entire subject. I am not posting this image because I am proud of it, nor do I think it is appropriate for any sort of publication - this is to simply show you what my amateur set up looks like (haha). 


After what felt like millions of shots, and after creating a mini flood of water on my living room floor, I was satisfied enough with a couple of my images. In need of cropping of course. 


I was informed that manual focus is the key. Practise makes perfect. I still need a lot of practise with water splash photography.

Here are some of the images I submitted for this month's 'foodography challenge'. Due to the simple colours of the capsicums, I wanted to keep the image simple as well so avoided using any props, and as a result achieving a much cleaner, more crisp and commercial shot. 


Friday, March 4, 2011

Sweet honey...

Check out this wonderful and simple Honey Peanut Brownie recipe by Mossop's Honey. Mossop's Honey is a family owned business in New Zealand which produces top quality New Zealand honey! Owned and established by my lovely sister-in-law's (my brother's wife's) family.

Unfortunately, because i'm based in Canada, I sadly have no access to Mossop's products so had to revert to a random brand of honey I found in our local grocery store for this recipe.

Thursday, March 3, 2011

Big steak salad!

Here's a great combination of greens and reds. The Big Steak Salad by The Pioneer Woman - Ree Drummond. 


Her marinade for the steak consists of garlic, ginger, Worcestershire sauce, soy sauce, chilli oil, salt, pepper, sugar, vinegar and lime juice. She suggests using a 'Mason' jar in her recipe to shake it all up- coincidently I had one lying around the kitchen.


Home made candied pecans.... yum! They were too sweet for my husband's liking, but I love them. At first, I thought I made some kind of huge mistake with this shot as I thought it looked a bit noisy. But no, thats the sugar  in the 'candy' mixture... 


Home made onion rings....

One thing i've realised in my work is that most of my shots involve at least one or two props, or some type of backdrop or background to the image. Im starting to shoot a little more 'commercial' these days to ensure I maintain that breadth in style with my photos. For example white on white. I think this is a good thing to do, especially when presenting a portfolio to a potential client. 


Ree Drummond uses blue cheese in her recipe. Im not usually a fan of blue cheese. I cringe whenever I smell it on my husband's breath (he is in love with that mouldy stuff). I must admit that blue cheese is great on pizzas and sometimes pastas, but I wasn't so sure about adding it to a salad so I substituted it for Parmigiano-Reggiano.