Showing posts with label Recipe. Show all posts

Friday, July 15, 2011

Summer refreshments

Summer is upon us. Some of my summer favourites - white wine, patio dining, salads and ice cream! 
Here is a quick recipe from mum... a delicious and refreshing salad which incorporates vegetables and fruit. 


Easy Summer Salad
  • Orange fleshed sweet potato
  • Pumpkin or butternut squash
  • Arugula
  • Pears
  • Maple syrup
  • 1/2 cup pumpkin seeds
  • Olive oil
  • Salt and pepper
  • Unsweetened yoghurt (optional)
DIRECTIONS
  1. Preheat oven to bake on 180C degrees. Cut sweet potato and pumpkin into 1 inch cubes. Sprinkle with olive oil, coat and bake for 15-20mins or until softened.
  2. Meanwhile, cut pears into cubes. Season with maple syrup, cover and microwave for 1.5 mins. Allow pears to cool. (You may also choose to leave the  pears marinating overnight the night before).
  3. Toast pumpkin seeds until slightly browned.
  4. Mix all ingredients in a bowl with olive oil, more maple syrup, seeds and arugula using hands.
  5. Serve with unsweetened yoghurt.

The amount of each ingredient is pretty much up to you. I love pumpkin seeds. My brother, sister and I use to snack on them when we were kids and I had not had them since, so they brought back a lot of memories!


A couple of weeks ago, I did some work for Smartbox Guidebooks where I photographed various restaurant establishments around the Toronto Downtown core, met owners and head chefs and photographed beautiful dishes. Watch this space as I will be posting some of those photos up soon!

Friday, June 17, 2011

Almond with Pears Cake and Camping!

Over the last week, we were out of Toronto camping with some friends. We camped a couple of nights in Algonquin Provincial Park, drove to Ottawa where we continued to camp and experienced a white water rafting adventure. The trip ended in Montreal (more camping). By the end of the week, I guess you could say I was all 'camped out'. It would be the first of many more camping trips this summer. I must say I enjoyed it a lot more than I expected to.


Prior to going away, we stocked up on a lot of food, and returned with only a few left overs. One item - some canned pears. With this, I decided to bake an Almond cake with caramelized pears.


At our campsite in Ottawa, the grounds were full of pine cones which we had to try and clear off before setting up our tent. You wouldn't want to be sleeping on top of a bed of pine cones! I thought it would be a neat idea to collect a bag of pine cones to take home. I don't know why - perhaps they might come in good use some time. Decorative purposes I guess.


This recipe was adapted from two different cake recipes...

Almond Cake with Caramelized Pears

Caramelized Pears
  • 3-4 firm pears, such as Comice (I just used canned pears)
  • 80g butter
  • 100g brown sugar
Almond Cake
  • 300g butter, softened
  • 250g castor sugar
  • 4 eggs
  • 150g standard flour
  • 150g almond meal
  • pinch of cinnamon
  • 1 tsp vanilla essence
  • Milk chocolate chips (optional)
  • Almond slices (optional)
DIRECTIONS
  1. Preheat oven to 170C
  2. Line a 20cm springfoam cake pan with non-stick baking paper.
  3. Peel, core and quarter the pears. Melt 80g butter in a small frying pan on high heat. Add brown sugar, mix well. Add in pears, stir them around and let them sit for 8-10mins or until they soften. They should be somewhat firm but not hard. Remove from heat and set aside.
  4. In a large bowl, beat the butter and castor sugar together until fluffy.
  5. Gradually mix eggs into the butter mixture one egg at a time
  6. Gradually beat in flour and almond meal. Add in cinnamon and vanilla essence. Incorporate mixture well until you get a thick batter.
  7. Pour cake mixture into cake tin and flatten with a spatula.
  8. If using chocolate chips and almond slices, sprinkle over surface of cake mixture.
  9. Line the top of the cake with pear slices, pushing each one into the cake mixture a little as you go.
  10. Bake in oven on middle rack for 55-60minutes or until the topping is a golden colour and a skewer comes out clean from the centre of the cake.
  11. Remove from oven and let the cake sit for 10mins before you remove it from the cake tin.

We had a lot of fun with food during our camping trip. Eating outdoors, the warm weather, making a fire...here ill share a few photos from our camping experience:


Its not camping without s'mores! The combination of graham crackers, toasted marshmallows and a slab of chocolate.


Grilled chicken, asparagus and corn. Yummo!


Grilled steak with Maple Syrup beans! 
I cannot wait to do it all again soon. 

Wednesday, April 20, 2011

Happy Easter!

Hi guys. Im back!
Its been about a month since my last blog post and I do apologize. Life has been throwing me a few awesome opportunities these past few weeks. You may recall that I was preparing to partake in my first client photo shoot. My part in that project is now complete and what a great experience!


These last few weeks I have been busy trying to get my website going, figuring out and getting things done for my freelance business and discussing new opportunities with different contacts.


During the client photo shoot, I had the opportunity to work side by side with a creative director for a marketing/design agency and for the first time, I also got to play around with some professional lighting equipment such as a Lowel DP Light and Lowel Reflective Umbrella. It was my chance to put what I have learnt over the last few months into practise. I must say that working with umbrellas in food photography is definitely not as forgiving as it would have been working with softboxes. This was one of the first things I learnt about in regards to lighting with food photography, and at least I got to experience and learn first-hand that this is in fact true. But nonetheless, the photo shoot was a success and one can only really learn to improve by experiencing. I have a couple more potential opportunities for other projects - watch this space! :)


Anyway, as Easter is upon us, I wanted to try out this chocolate recipe I stumbled across a few weeks ago in a food magazine - homemade Chocolate Covered Cream Easter eggs!


Chocolate Covered Cream Eggs
recipe adapted from Experience Magazine
(makes approx 16 eggs)

  • ¾ cups (175ml) unsalted butter, softened
  • ½ cup (125ml) sweetened condensed milk
  • 2 tsp (10ml) vanilla extract
  • pinch of salt
  • 5 cups (1.25L) icing sugar
  • yellow and red food colouring
Coating
  • 10oz (300g) milk chocolate
  • 1 Tbsp vegetable shortening
DIRECTIONS
  1. In a large bowl, beat together butter, condensed milk, vanilla and salt.
  2. Using low speed of an electric mixer, beat in 4 cups of the icing sugar. Add the remaining icing sugar and, using hands, knead into dough until smooth.
  3. Place a third of the dough in a bowl and tint orange using the yellow and red food colouring. Make 16 small balls with the orange dough.
  4. Divide the white dough into 16 pieces and flatten each piece. Then place each orange ball in the centre of each white piece.
  5. Shape the white dough around the orange ball to form the shape of an egg. Place on a parchment paper lined baking sheet and refrigerate for at least 2 hours or until very firm. 
Coating
  1. In a bowl set over hot (not boiling) water, melt chocolate with vegetable shortening.
  2. Using two forks, stab each egg carefully and dip into the chocolate. Let the excess drip off. Place on a parchment paper lined baking sheet. Drizzle some of the remaining chocolate over the top if desired and refrigerate for about 1 hour or until set.
[Custom Lettering : Melt some white chocolate and place in a piping bag or small resealable bag with trip cut off and pipe initials, letters, patterns onto each egg.]


16 eggs would have been too many for two, so divided all the ingredients by half in order to make 8 eggs. Be warned- these eggs are pretty sweet. 'F' for Federico who complained they were way too sweet. 


Thursday, March 17, 2011

Ratatouille!

No not the movie :)


My sister gifted me the Cook's Bible by Lorraine Turner a few years ago and I have been following recipes from it since.  I had never, until a few nights ago however made Ratatouille before. Its so far one of my favourite vegetarian recipes.


The bowl in this pic was a birthday gift from my lovely friend Kirsten. It came with a matching platter and any kitchen ware gifts are always welcome! 

Ratatouille
(serves 4)

  • 1 Aubergine, about 250g/9oz
  • 4 Tbsp olive oil
  • 2 garlic cloves, chopped
  • 1 large onion, chopped
  • 2 red peppers (capsicums), deseeded and cut into bite-sized chunks
  • 800g/1 lb 12 oz canned chopped tomatoes
  • 2 courgettes, sliced
  • 1 celery stick, sliced
  • 1 tsp sugar
  • 2 Tbsp fresh thyme, chopped
  • salt and pepper
  • fresh thyme sprigs, to garnish
DIRECTIONS
  1. Trim the aubergine and cut it into bite-sized chunks, then place it in a colander. Sprinkle with salt and leave to stand for 30mins.
  2. Heat the oil in a large saucepan over medium heat. Add the garlic and onion and cook, stirring for 3mins until softened slightly. Rinse the aubergine and drain well, then add it to the saucepan with the red peppers. Reduce the heat and cook gently, stirring frequently for a further 10mins.
  3. Stir in the tomatoes, courgettes, celery, sugar and thyme, and season to taste with salt and pepper. Bring to the boil, then reduce the heat, cover the saucepan and leave to simmer gently for 30mins.
  4. Remove the saucepan from the heat, transfer to serving plates and garnish with fresh thyme sprigs.
The only type of aubergines my local grocery store stocked at the time was Chinese Aubergines, so I had no choice but to use this instead. They do not taste that differently from the usual aubergine ('American' or 'Globe' eggplant). If you use Chinese aubergines, you can eliminate Step 1 in the recipe as they have thinner skins and are more delicate in flavour, they also do not tend to have many of the seeds that make American/Globe eggplants bitter.

Ratatouille is such a versatile dish and really useful when catering for vegetarians. We had it for dinner as a side to compliment a Roasted Garlic chicken. It also goes well with jacket potatoes, rice or couscous. I like to sprinkle mine with a little parmesan cheese :)


Because of this cookbook, I came across another fantastic food photographer, Clive Bozzard-Hill. His style is pretty commercial, and I think i just might pick up ideas from his work as well from now on :)

Pumpkin spice and all things nice

I spent an entire day baking yesterday, primarily to finish off my leftover pumpkin pie puree from when I baked my Pumpkin Bread a few weeks ago..


I baked Pumpkin Pie Biscotti and Pumpkin Molasses Cookies and they were a hit with the hubby. 


Both recipes were taken from Jamie over at My Baking Addiction. She used pecans in her recipe however, but I thought almonds would compliment the biscotti a little better. All depends on your personal taste I suppose.


I wanted to fill the frame of this shot with a teacup and saucer, but currently do not own any so substituted for the coffee mug. I realize part of the biscotti piece has been cropped out - that was intentional as I did not want to make it appeared too centred. 


Here is the recipe from Jamie. I have adapted it slightly. She mentions that the brown sugar may have caused her biscotti to become too moist, so I substituted some of it for white sugar.

Pumpkin Pie Biscotti
  • 3 ½ cups all-purpose flour
  • 1 cup firmly packed brown sugar
  • ½ cup white granulated sugar
  • 2 tsp baking powder
  • ½ tsp salt
  • 2 tsp pumpkin pie spice (or combine 1 tsp cinnamon, ½ tsp nutmeg, ¼ tsp ground ginger, ¼ ground cloves)
  • ½ cup pumpkin puree
  • 2 large eggs, lightly beaten
  • 1 Tbsp vanilla extract
  • 2 Tbsp butter
  • 1 ¼ cups almonds, coarsely chopped
DIRECTIONS
  1. Preheat oven to 350 F (180 C)
  2. Combine flour, brown sugar, white sugar, baking powder, salt and pumpkin pie spice in a large bowl, stir well. In another bowl, combine pumpkin puree, eggs and vanilla, stirring well with a wire whisk. Slowly add pumpkin mixture to flour mixture, stirring until dry ingredients are moistened (Mixture will be very crumbly; it will gradually become moist after stirring. I found using my hands to knead it all together easier).
  3. Melt butter in a large skillet over med-high heat. Add nuts. Cook, stirring constantly, until nuts are browned. Remove from heat and cool completely.
  4. Knead or gently fold cooled nuts into dough. Place dough on a lightly floured surface and divide into 2 portions. Lightly flour hands and shape each portion into a 2x 10” long log. Place logs 3” apart on parchment paper. Bake for 24mins. Cool logs for 15mins. Reduce oven temperature to 300 F (140 C).
  5. After some cooling, move a loaf to a cutting board and cut into ½ inch thick pieces. Repeat with other loaf. The interior of each biscotto should still be just a little moist (while the exterior is nice and hard). Avoid using a serrated knife and try cutting straight down rather than ‘sawing’ to avoid crumbling.
  6. Place the biscotti with a cut side facing up on a half sheet pan and bake for 8mins. Remove the pan and flip all the biscotti over so the other cut side is now facing up. Bake for another 7mins. Set all pieces on a wire rack to cool making sure that none of the biscotti are touching each other. If they are placed too close together, they could get a little soft or soggy as they cool.
You can dip the biscotti in melted chocolate or drizzle some chocolate on top. I chose not to. Maybe next time


I am starting to get a little tired of my backdrops. I have been searching online for places where I can obtain scrap wood boards, which I can also paint different colours in order to create an illusion of different tables and surfaces. I suppose I should head over to a hardware or home improvement store. The Food Blog Forum has some good tips on this. The only issue for me is I do not have a car here in Toronto, so transporting huge wood boards on public transport can be an issue. Ill have to figure something out.


These Pumpkin Molasses Cookies are deliciously moist. Try out the recipe.

Thursday, March 10, 2011

Oreos, big and small

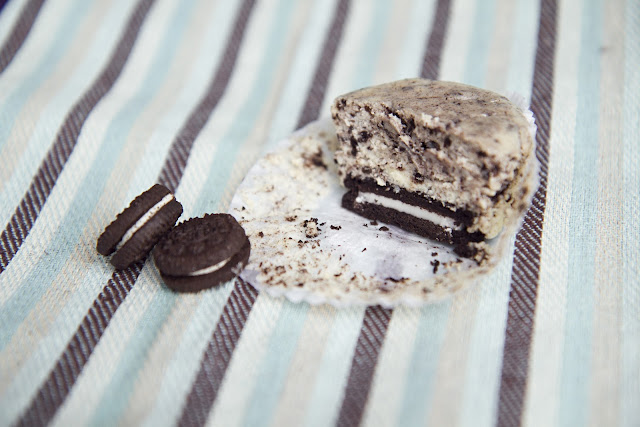
Who doesnt love Oreos? Oreos, big or small, double cream or original, they are all sinfully addictive. I came across a very cute recipe last week - Mini Oreo Cheesecake. So simple with few ingredients.

Mini Oreo Cheesecakes
(makes approx 12 mini cheesecakes)
  • 1 pkg. Oreo cookies
  • 2 (8 oz or 250g) packages of cream cheese, softened
  • ½ cup granulate sugar
  • 1 tsp vanilla extract
  • 2 large eggs
  • cupcake liners
DIRECTIONS
  1. Preheat oven to 325 F (160 C). Line cupcake tray with cupcake liners. Place one Oreo cookie in each cupcake liner
  2. Crush up remaining cookies finely and set aside
  3. Beat the cream cheese until smooth. Add the sugar, eggs and vanilla extract, and beat until fully incorporated and smooth
  4. Fold in crushed Oreo cookies
  5. Spoon mixture into the cupcake cups about ¾ of the way up
  6. Bake for 20-25mins. Keep a close eye on it as you do not want the cheesecakes to brown
  7. Let cool and refrigerate for up to 3 hours before serving


I love how the Oreo cookie acts as the crust of the cheesecake...


And now following in Aran Goyoaga's and Beatrice Peltre's footsteps...


If you follow my blog, you'll remember how I mentioned that im trying to also shoot with a more commercial style. Here are my 'more commercial' shots....

Thursday, January 27, 2011

Thai obsession

If you know me well, you'd know about my love for Thai food. Thai cuisine although usually consisting of a lot of aromatic ingredients  is usually lightly prepared. The combination of flavours used can be highly addictive! Back home in Wellington, New Zealand, there is a fantastic thai restaurant located down the road from the office where I used to work. My friends and I would make frequent visits there on our lunch breaks. Aroy Thai Express - owned by a friend of mine, of course originally from Thailand.  If you're ever in Wellington, New Zealand, definitely pay Aroy on Cuba Street in the CBD a visit. You'll find yourself going back for more! 


My favourite Thai dish has always been the 'Larb' or 'Laab' Chicken - a light thai dish consisting of ground minced chicken, flavoured with fish sauce, lime juice and fresh herbs. The chicken is mixed with chilli, mint and sometimes various vegetables. 


I decided to try making Pad Thai noodles instead this week. I love a challenge from time to time, and was told my one of my Thai friends that this dish was a bit harder than Laab Chicken to imitate. 'Pad' Thai or 'Phat' Thai is a stir-fried rice noodle dish consisting of fish sauce, eggs, fish sauce, red chilli pepper, tamarind juice, bean sprouts, chicken or shrimp, and topped off with crushed peanuts, lime and coriander. 


I shot the first two images here with the Canon EF 70-200mm f/2.8 L IS USM lens we hired over the weekend. I used this lens with the intention of compressing or stacking the objects behind each other at different distances in the field of view. I have found this lens to be useful in that it allowed me to place these objects behind each other without the viewer knowing how much distance actually lied between them. It allows you to fill your frame more effectively. I used an aperture of f/ 10 here, so that the objects were all in sharp focus with a little bit of the coriander at the back dropping off.  


My Pad Thai noodles was somewhat of a success... one issue- I forgot the eggs!! No wonder it turned out a little too moist... 


Pad Thai Noodles
(Serves 2) Recipe by Darlene Schmidt
  • 8 oz. thai rice noodles (banh pho noodles) or enough for 2 people
  • 1 ½ cups raw chicken breast or thigh meat, sliced
  • 2 tsp cornstarch
  • 2 Tbsp soy sauce
  • 4 cloves garlic, minced
  • 1-2 fresh red chillies, minced
  • 2 eggs
  • 3 cups fresh bean sprouts
  • 3 spring (green) onions, sliced
  • 1 cup fresh coriander
  • ⅓ cup chopped or crushed peanuts
  • ½ cup chicken stock
  • ¼ tsp freshly ground white pepper
Sauce
  • ¾ Tbsp tamarind paste (dissolved in ¼ cup warm water)
  • 2 Tbsp fish sauce
  • ¼ tsp chilli flakes or cayenne pepper
  • 3 Tbsp brown sugar
DIRECTIONS
  1. Bring a large pot of pot to a boil and remove from heat. Dunk in your rice noodles. Allow noodles to soak while you prepare the other ingredients. Note: you will be frying the noodles later, so you don't want to over-soften them now. Noodles are ready to be drained when they are soft enough to be eaten, but are still firm and a little crunchy. Drain and rinse with cold water. Set aside.
  2. Make the Pad Thai Sauce by combining the sauce ingredients together in a cup. Stir well to dissolve the tamarind paste and brown sugar. Set aside. Note: this may seem like a lot of sugar, but you need it to balance out the sourness of the tamarind - this balance is what makes Pad Thai taste so amazing!
  3. Place chicken slices in a small bowl. Pour the marinade (2 tsp. cornstarch dissolved in 2 Tbsp. soy sauce) over the chicken. Stir well and set aside.
  4. Warm up a wok or large frying pan over medium-high heat. Add 1-2 Tbsp. oil plus garlic and minced chili, if using. Stir-fry until fragrant (30 seconds).
  5. Add chicken together with the marinade. Stir-fry 30 seconds to 1 minute. When wok/pan becomes dry, add a little chicken stock, 1-2 Tbsp. at a time, to keep the chicken frying nicely. Continue stir-frying in this way until the chicken is cooked (5-8 minutes).
  6. Using a spatula or wooden spoon, push chicken to the outside of the wok or pan. Now add the egg, pouring it into the space you've made in the centre. Quickly stir-fry until egg is cooked (this part is like making scrambled eggs).
  7. Add the noodles, and pour the Pad Thai sauce over. Using two spatulas, wooden spoons, or other utensils, immediately stir-fry the noodles. Use a gentle "lift and turn" method (like tossing a salad) to prevent noodles from breaking. Stir-fry in this way 1-2 minutes. If you find your wok/frying pan too dry, push noodles aside and add a little more oil to the bottom (but no more broth, or the noodles will become soggy).
  8. Add the bean sprouts and sprinkle over the pepper. Continue tossing 1 more minute, or until noodles are cooked. Noodles are done to perfection when they are no longer hard or crunchy, but chewy-sticky wonderful!
  9. Taste-test for seasoning, adding more fish sauce until desired flavor is reached. Toss well to incorporate.
  10. Lift noodles onto a serving plate. Top with generous amounts of fresh coriander, spring onion, and crushed/chopped nuts. Add fresh lime wedges (lime is great squeezed overtop).


Tuesday, January 25, 2011

Sweet and light

Over the weekend we hired a Canon EF 70-200mm f/2.8 L IS USM Lens. We currently only own two lenses. A Canon EF-S 17-55mm f/2.8 IS USM, and a Canon EF 50mm f/1.8 prime lens. I had been wanting a telephoto lens for quite some time, especially to allow me to obtain those tighter shots in my food photography.


So this week has been my opportunity to experiment with the 70-200mm. So what do I think? To be honest, I don't really know. Apart from the considerable increase in weight this lens has compared to the 17-55mm, obviously having to stand at a much further distance from my subjects. I am still yet to learn what advantages a telephoto lens can bring to my photos. I suppose due to the longer lens and with aperture f/2.8, it allows my backgrounds to 'drop off' more and allows the subjects in my photo to appear more 'stacked'. I think i'd much rather buy an extension tube instead of investing in a telephoto lens for food photography at this point. After all, Its not like i work in a big studio kitchen - just our little 8x5m apartment kitchen :) I will be conducting some research this week on why a telephoto in regards to the output quality of food photos.


I wanted to bake something with chocolate this week because it had been a while since I had a nice chocolate flavoured cake. But I didn't want anything too sweet and rich either, so I decided to bake a basic vanilla and chocolate marble cake with a hint of lemon. 


Now time to experiment with the 'new' lens. These photos were taken in very low light, with the lens mounted on a tripod of course. I struggled a little with setting up my composition from time to time because of the weight of the lens (i'm a somewhat small person so hand holding this lens can be a bit of a struggle!) and having to always step further and further back.


This week I am also trying to experiment with different Photoshop Actions and Filters. I really adore Aran Goyoaga and Beatrice Peltre's work. I love the colours and textures they use in their food styling. Textures, creative props and colours really make a difference in excellent food styling, so I did a bit of shopping this week to add to my prop collection! I noticed that they also play on Photoshop Actions to  bring out these colours and textures in various different ways. 


Food photography is all about making the food look the way consumers see it in their mind's eye. Its not as simple as taking a beautiful dish you cooked for dinner, throwing it down and taking a photo. Alot of the work goes into the styling itself.


The recipe I used for this cake is very easy. I took a basic recipe and adapted it a little, just by throwing in some lemon zest and lemon extract to give the cake a little bit of a lemon flavour. I also substituted milk for buttermilk in this recipe. 


Lemon and Chocolate Marble Cake
  • 2 cups all-purpose flour
  • 2 tsp baking powder
  • ½ tsp salt
  • 1 cup white sugar
  • ½ cup butter, softened
  • 2 eggs
  • 1 tsp vanilla extract
  • 1 cup buttermilk
  • 2 Tbsp unsweetened cocoa powder
  • zest of 1 lemon
  • 2 Tbsp lemon extract
Lemon Glaze
  • ¾ cup confectioners sugar
  • 2 Tbsp lemon extract

DIRECTIONS
  1. Preheat oven to 350 F (175 C). Grease and flour a 9 inch round cake pan.
  2. Place flour, baking powder, salt, sugar, butter, eggs, vanilla extract and buttermilk into a mixing bowl. Beat slowly to moisten, then beat with an electric mixer at medium speed for about 2mins until smooth.
  3. Beat in lemon zest and lemon extract. Reserve half the batter. Pour the remainder into the pan.
  4. Stir cocoa into the reserved batter. Drop by spoonfuls over the top of the white batter. Using a knife, swirl the cocoa batter into the white batter to incorporate it in a marble effect.
  5. Bake in preheated oven for 30-35mins, until an inserted wooden pick comes out clean.
  6. Remove cake from oven and let it cool completely. Meanwhile, for the sugar glaze, pour confectioners sugar in a bowl and hand-mix in lemon extract until desired consistency. Use a piping bag or spoon to drizzle glaze over cake.